LeetCode LRU快取實作 C#(Least Recently Used Cache)
7月開始新計畫: Leet Code 2日一題(1、3丶5) 各找一個c#適合解決的LeetCode 題目來保持暑期醒腦
題目:https://leetcode.com/problems/lru-cache/
wiki: https://en.wikipedia.org/wiki/Cache_replacement_policies#LRU
Implement the LRUCache class:
LRUCache(int capacity)Initialize the LRU cache with positive sizecapacity.int get(int key)Return the value of thekeyif the key exists, otherwise return-1.void put(int key, int value)Update the value of thekeyif thekeyexists. Otherwise, add thekey-valuepair to the cache. If the number of keys exceeds thecapacityfrom this operation, evict the least recently used key.
The functions get and put must each run in O(1) average time complexity.
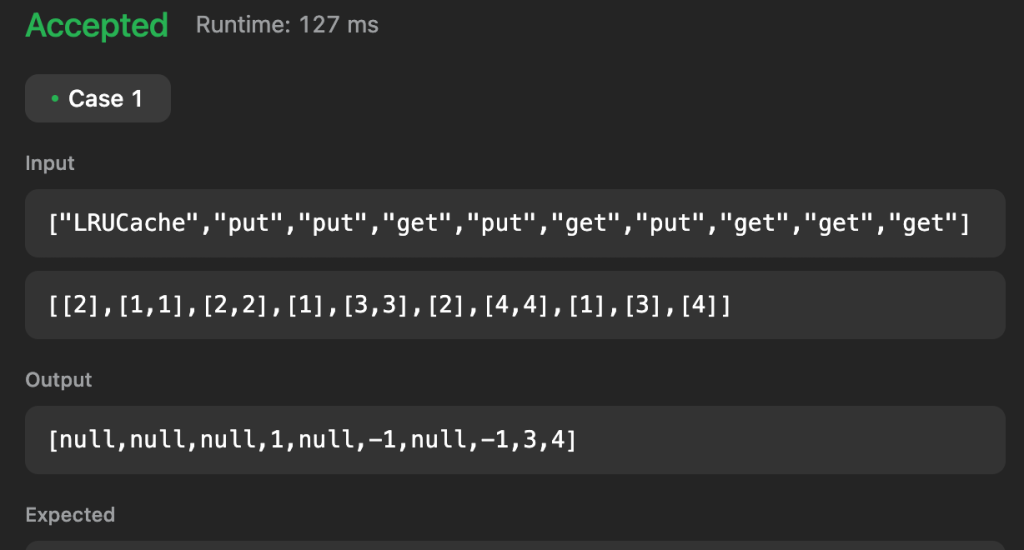
Example 1:
Input
["LRUCache", "put", "put", "get", "put", "get", "put", "get", "get", "get"]
[[2], [1, 1], [2, 2], [1], [3, 3], [2], [4, 4], [1], [3], [4]]
Output
[null, null, null, 1, null, -1, null, -1, 3, 4]
Explanation
LRUCache lRUCache = new LRUCache(2); lRUCache.put(1, 1); // cache is {1=1} lRUCache.put(2, 2); // cache is {1=1, 2=2} lRUCache.get(1); // return 1 lRUCache.put(3, 3); // LRU key was 2, evicts key 2, cache is {1=1, 3=3} lRUCache.get(2); // returns -1 (not found) lRUCache.put(4, 4); // LRU key was 1, evicts key 1, cache is {4=4, 3=3} lRUCache.get(1); // return -1 (not found) lRUCache.get(3); // return 3 lRUCache.get(4); // return 4
Constraints:
1 <= capacity <= 30000 <= key <= 1040 <= value <= 105- At most
2 * 105calls will be made togetandput.
LinkedList第一版本:
namespace LeetCode2023_Paul.LRUCache;

public class LRUCache
{
    private Node? _rootNode;
    private int _capacity;


    public LRUCache(int capacity)
    {
        _rootNode = new Node();
        _capacity = capacity;
    }

    private (int, Node) SearchKey(Node? currentNode, int key)
    {
        if (currentNode == null)
        {
            return (-1, null);
        }

        return currentNode.Key != key ? SearchKey(currentNode.Next, key) : (currentNode.Value, currentNode);
    }

    private int CountNode(Node? currentNode)
    {
        if (currentNode == null)
        {
            return 0;
        }

        return 1 + CountNode(currentNode.Next);
    }

    public int Get(int key)
    {
        var (value, foundNode) = SearchKey(_rootNode, key);

        if (value != -1)
        {
            if (foundNode.Key != _rootNode.Key)
                RemoveNode(foundNode);
            AddNode(foundNode);
        }

        return value;
    }

    private void removeLast(Node currentNode)
    {
        if (currentNode.Next != null && currentNode.Next.Next == null)
        {
            currentNode.Next = null;
        }
        else if (currentNode.Next != null)
        {
            removeLast(currentNode.Next);
        }
    }

    public void Put(int key, int value)
    {
        var (foundValue, foundNode) = SearchKey(_rootNode, key);

        if (foundValue == -1)
        {
            if (CountNode(_rootNode.Next) == _capacity)
            {
                //remove last
                removeLast(_rootNode);
            }

            Node newRootNode = null;
            newRootNode = new Node() {Key = key, Value = value, Next = null};
            AddNode(newRootNode);
        }
        else
        {
            RemoveNode(foundNode);
            foundNode.Value = value;
            foundNode.Prev = null;
            AddNode(foundNode);
        }
    }


    private void AddNode(Node node)
    {
        var after = _rootNode.Next;
        _rootNode.Next = node;

        node.Prev = _rootNode;
        node.Next = after;
        if (after != null)
            after.Prev = node;
    }


    private void RemoveNode(Node node)
    {
        Node before = node.Prev;
        Node after = node.Next;
        before.Next = after;
        if (after != null)
            after.Prev = before;
    }
}

public class Node
{
    public int Key { get; set; }
    public int Value { get; set; }

    public Node? Prev { get; set; }
    public Node? Next { get; set; }
}
使用LinkedList的寫法後(突然發現腦袋真的要很有結構跟圖像化的能力XD),奮戰許久終於通過了測試(可能我資質太差)
結果要提交的時候,壓測悲劇出現XD。這個 我們常常開發的時候會遇到的情況真的滿類似的
先求有,就上線,殊不知一個高峰或是沒想到情況就是會這樣發生了..,然後導致程式 crash或lock, timeout了. 。很有既視感 。
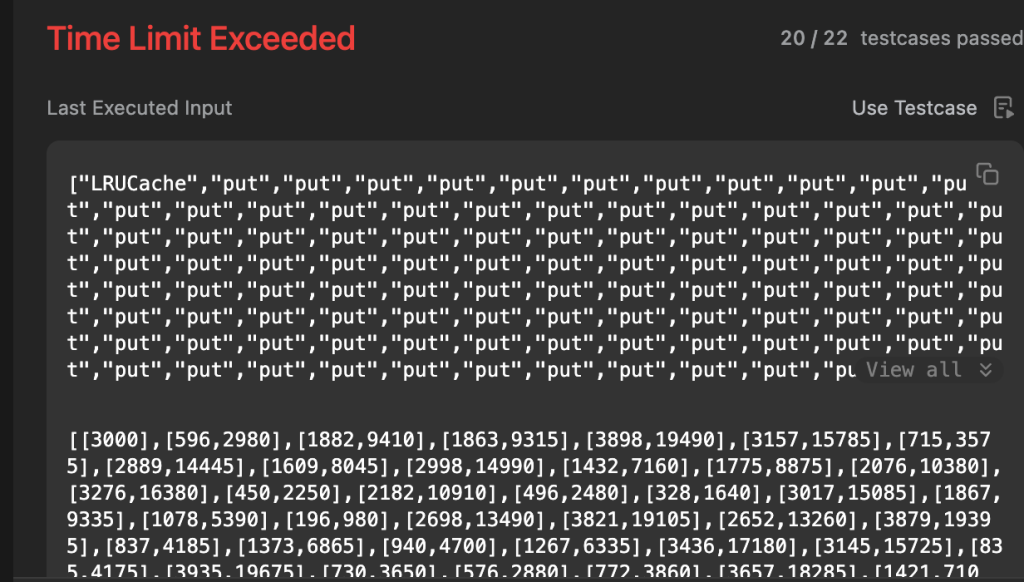
結果Leetcode網址直接給我噴 Time Limit Exceeded XD
後來仔細參考了一下定義。重新 調整了一下 C#的寫法,後來看了一些人的作法,覺得確實可以用很多c#的物件特性直接解決,改寫如下 :
using System;
using System.Collections.Generic;
using System.Linq;

namespace LeetCode2023_Paul.LRUCacheV1;

public class LRUCacheV2
{

    private int _capacity;
    private List<int> _keys;
    private Dictionary<int, int> _cache;

    public LRUCacheV2(int capacity)
    {
        _keys = new List<int>();
        _cache = new Dictionary<int, int>();
        _capacity = capacity;
    }

    public int Get(int key)
    {
        var value = -1;
        if (_cache.ContainsKey(key))
        {
            value = _cache[key];
            //有被抓到的key重新 add到後面,實現愈少用到的key會浮在第一個
            _keys.Remove(key);
            _keys.Add(key);
        }
        return value;
    }

    public void Put(int key, int value) {
        if (_cache.ContainsKey(key))
        {
            _keys.Remove(key);
            _keys.Add(key);
            _cache[key] = value;
        }
        else
        {
            if (_cache.Keys.Count == _capacity)
            {
                //因為最少用到的Key總是在第一個,所以cache數滿了的話,就移掉第一個(這邊跟NodeList不太一樣,但是利用List的特性可以作一樣效果
                //LRU的意思就是Least Recently Used, 相反則是LFU Frequently Used
                var lruKey =  _keys.FirstOrDefault();
                _keys.Remove(lruKey);
                _cache.Remove(lruKey);
            }

            _keys.Add(key);
            _cache.Add(key, value);
        }
    }
}
哈,簡單很多,這邊C#實作上幾點重點:
Dictionary是無序的排列集合,不可以用來作dequeue(像他的last,first)會有問題
利用 List<int>作有序的管理,然後Dictionary的Key作KeyValue的Mapping
這樣是最快的,也不用自已串LinkedList作遞迴,非常的方便~~
與其使用 LInkedList在每次抓 node的時候作movement,不如直接remove重加來的直覺~!